User Guide for Using Conversations Inbox on tyntec Customer Portal
Welcome to the Conversations Inbox user guide—your go-to resource for navigating and optimizing your experience on the tyntec Customer Portal.
This guide provides step-by-step instructions, best practices, and troubleshooting tips to help you manage conversations efficiently. Whether you’re setting up your WhatsApp Business account, organizing teams, or utilizing advanced messaging features, this guide equips you with the knowledge to make the most of our platform. Let’s get started!
WhatsApp for Business
To start using Conversations Inbox, you must set up your WhatsApp for Business account. Details of your existing WhatsApp Business accounts can be found under the WhatsApp for Business section in the Customer Portal. Here, you can add, edit, or delete phone numbers and Message Templates.
Phone numbers and Message Templates maintained here can be used to reach out to customers via Conversations Inbox.
Phone Numbers
A WhatsApp phone number is a mobile or landline number linked to a WhatsApp Business account. It enables businesses to engage with customers through real-time messaging, providing support, updates, and seamless communication.
How to use a WhatsApp phone number
- ● Customer Interaction: Customers can send messages to the business’s WhatsApp phone number just as they would in a regular WhatsApp chat.
- ● Business Communication: Companies can use WhatsApp to send notifications, respond to inquiries, and offer customer support.
- ● Verified Business Accounts: A verified WhatsApp Business account displays the company’s name instead of the phone number, enhancing brand recognition.
How to add a phone number to a WhatsApp Business account
- 1. Navigate to the WhatsApp for Business
- 2. Click the Add phone number
- 3. Follow the on-screen instructions to complete the setup.
Each phone number is linked to a single WhatsApp Business account. For more details, visit: Help Center – WhatsApp Business phone numbers.
Message Templates
WhatsApp Message Templates are pre-approved message formats that businesses use for proactive customer communication. These templates help maintain consistency, ensure compliance with WhatsApp policies, and streamline messaging, especially for notifications and automated responses.
How WhatsApp Message Templates are used
- ● Approval Process: Businesses must submit Message Templates for approval before using them in business-initiated chats.
- ● Personalization: Templates support dynamic placeholders, allowing businesses to personalize messages with customer-specific details (e.g., name, order status).
- ● Common Use Cases: Businesses frequently use templates for:
- o Order updates
- o Appointment reminders
- o Payment confirmations
- o Customer service follow-ups
- ● Multimedia & Interactivity: Templates can include text, images, videos, and interactive buttons to enhance engagement.
- ● Quality Control: WhatsApp monitors template quality through customer feedback and may restrict templates with poor ratings.
How to add a new Message Template
To create a new Message Template in your WhatsApp Business account, follow these steps:
- 1. Go to the WhatsApp for Business page.
- 2. Click the New message template button.
- 3. Follow the on-screen instructions to submit your template for approval.
All Message Templates are linked to a specific WhatsApp Business account. For more details, visit: Help Center – WhatsApp Business Message Templates.
⚠️ Note: phone number and Message Templates are not linked directly but through a Business account. When sending messages to customers, businesses can select which Message Template will be used and from which phone number they will be sent.
Teams
The Teams feature in the tyntec Customer Portal is designed to help companies efficiently manage their users by grouping them into teams. With this feature, businesses can organize users based on roles, locations, or specific responsibilities, ensuring better control and access management. Teams can also be assigned to various business assets, such as Sending Profiles, Quick Replies, Tags, and Business Hours.
Key Benefits
- ● Better User Organization: Group users based on roles, locations, or use cases.
- ● Granular Access Control: Assign business assets to specific teams, ensuring only the relevant users have access.
- ● Improved Collaboration: Users in the same team can seamlessly work together on assigned resources.
How to create a Team
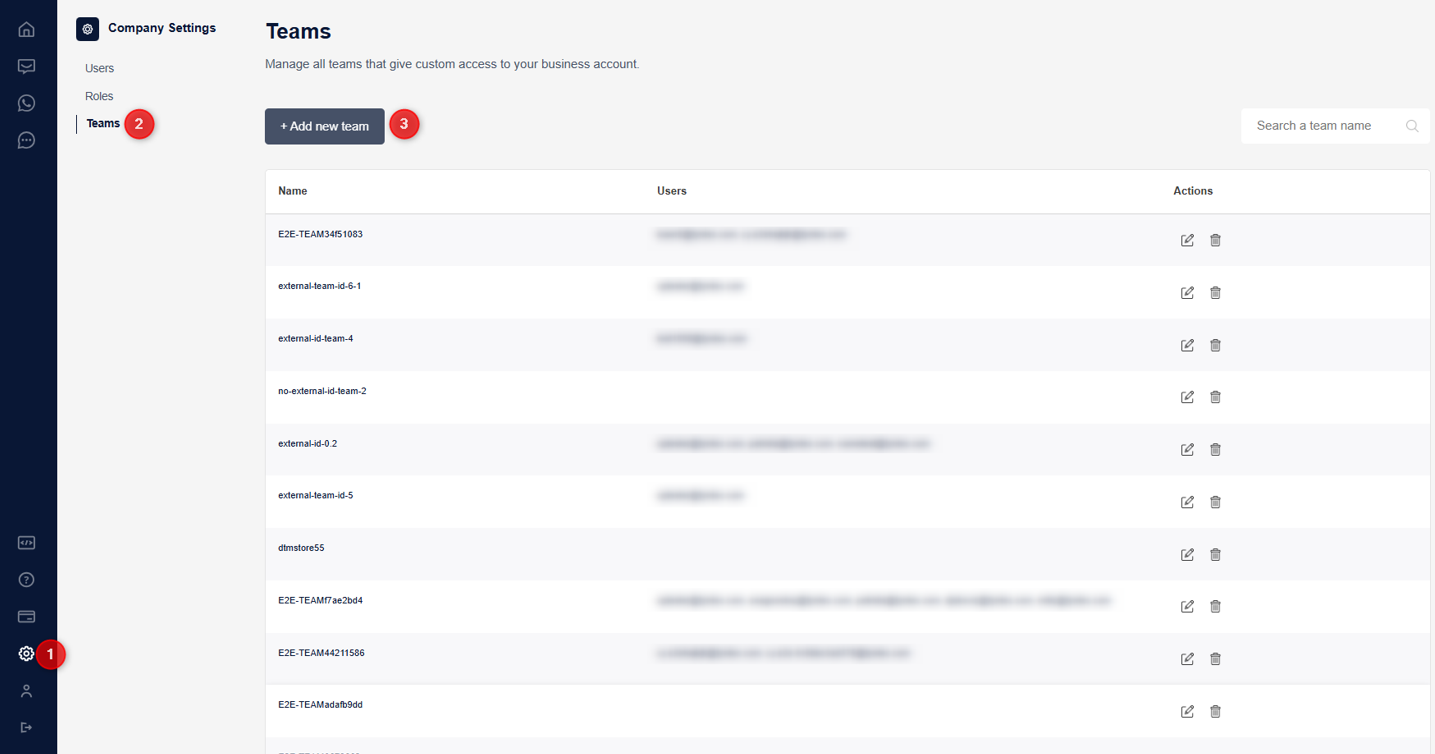
- 1. Go to Company Settings > Teams.
- 2. Click the + Add new team button.
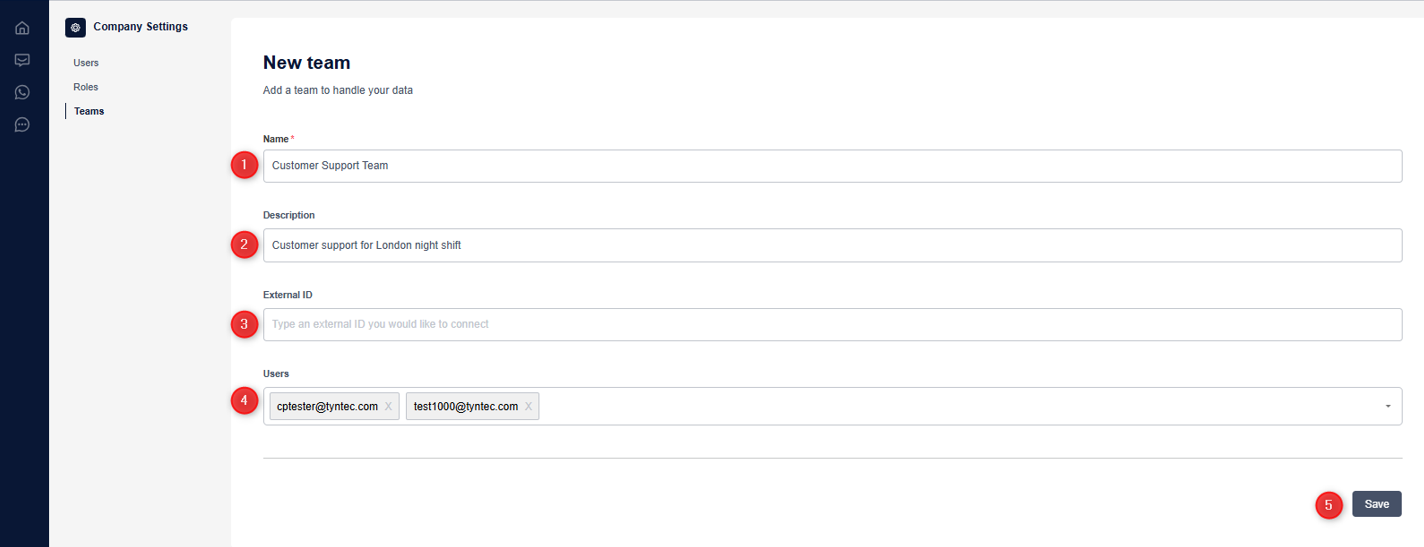
- 3. Fill in the New Team creation form:
- ● Name (mandatory field)
- ● Optional fields: Description, External ID, and Users
- 4. Click Save to finalize the Team creation process.
How to edit or delete a Team
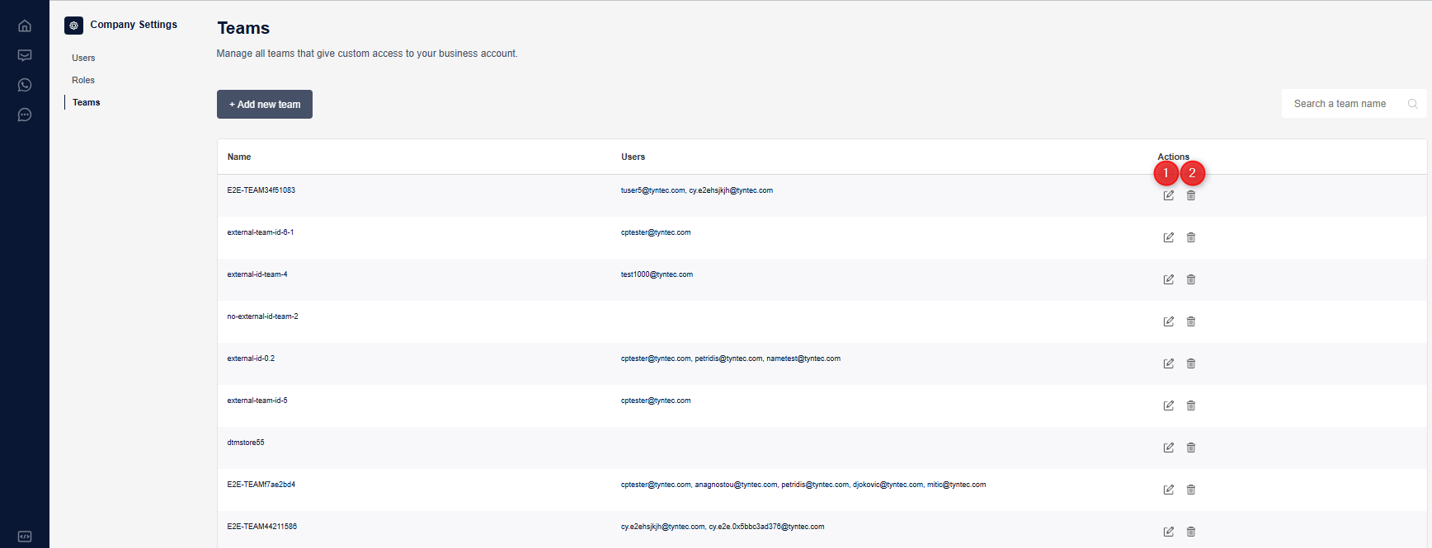
- 1. Go to Company Settings > Teams to view a table of existing Teams.
- 2. In the Actions column (far right), you’ll find two icons:
- o Edit ✏️: Opens an edit form to update Team details.
- o Delete 🗑️: Removes the Team from the list.
Conversations Inbox
The Conversations Inbox is a web-based omnichannel platform that enables businesses to engage in two-way communication with customers across various mobile channels.
Follow these instructions to use the Conversations Inbox with WhatsApp Business.
For SMS and MMS, contact tyntec’s support team at support@tyntec.com to configure the channels.
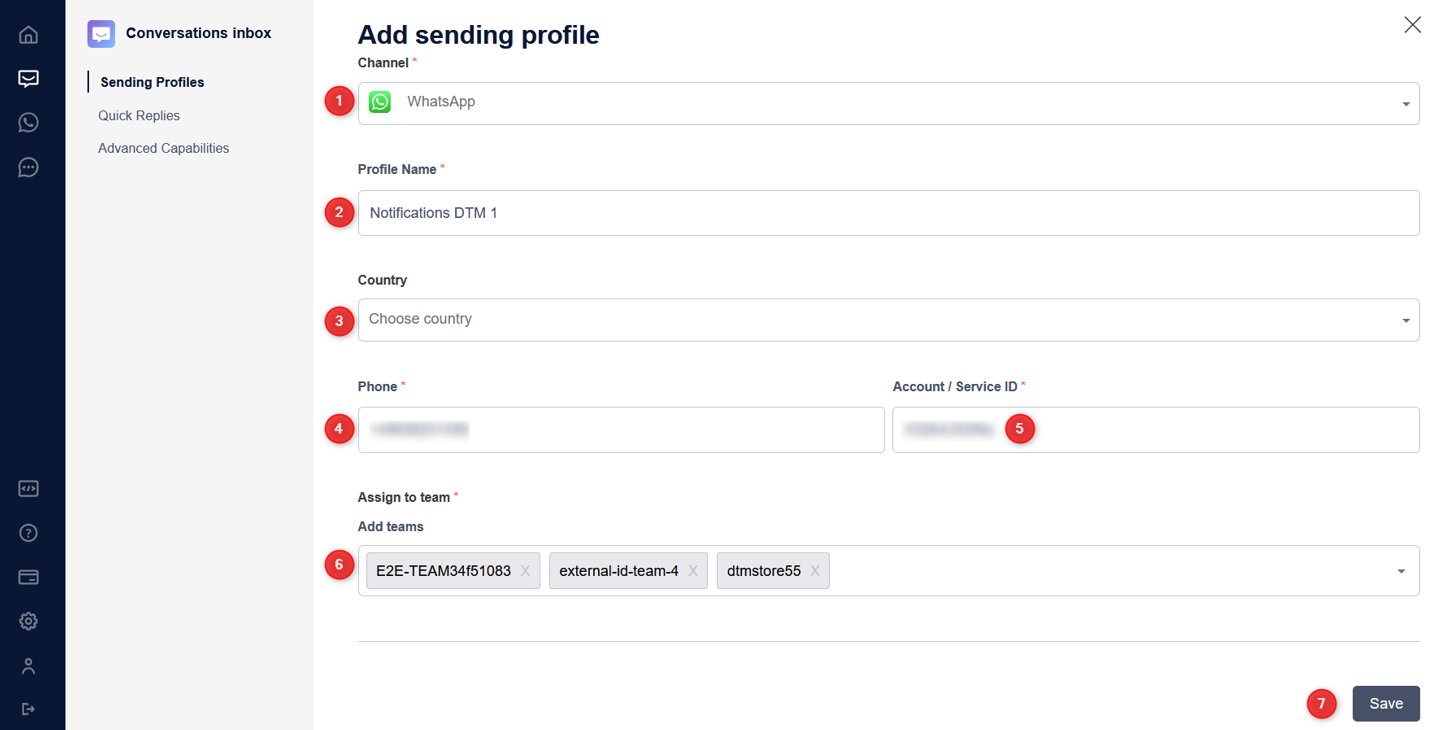
Sending Profiles
A Sending Profile represents a business’s identity on a specific messaging channel (e.g., WhatsApp, Viber, Messenger). It determines which profile (sender/phone number) is used for communication between the business and its customers.
How Sending Profiles are used
- ● Channel-Specific Identification: Each Sending Profile is linked to a specific phone number or account on a messaging platform, ensuring clear recognition by customers.
- ● Multiple Profiles for Different Needs: Businesses can create multiple Sending Profiles for different channels or departments (e.g., customer support vs. order notifications).
- ● Access Control: Sending Profiles allow businesses to restrict access, ensuring only designated teams can use specific phone numbers or channels.
- ● Structured & Secure Communication: It maintains organized messaging, ensuring messages are sent from the correct profile based on team responsibilities and context.
How to create a Sending Profile
- 1. Navigate to Conversation Inbox > Sending Profiles.
- 2. Click the + Add New Sending Profile button.
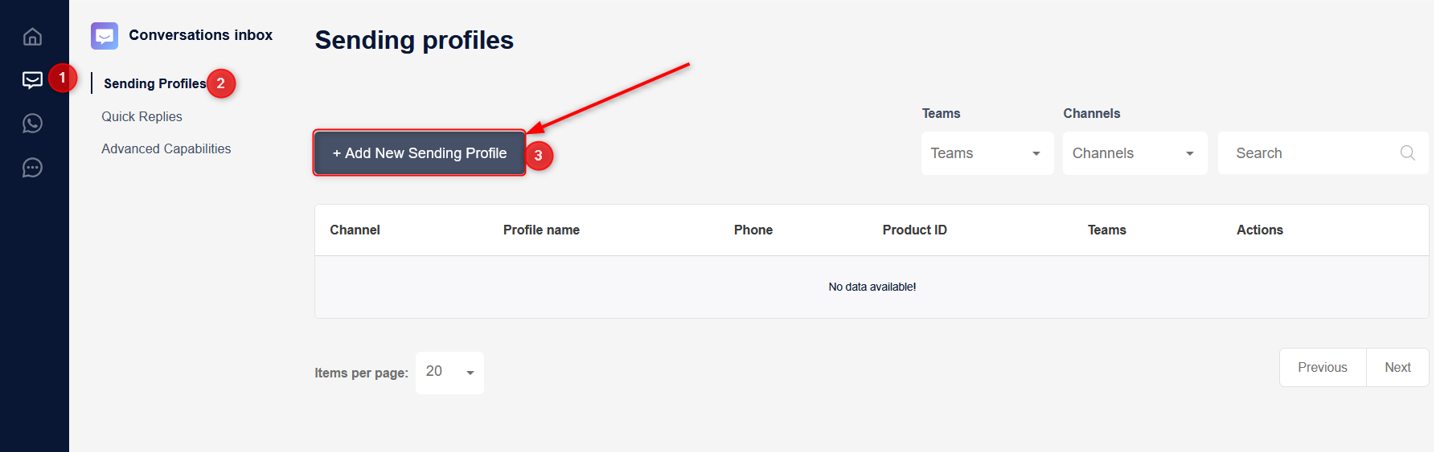
- 3. Fill in the required fields in the form (all fields are mandatory except Country).
- 4. Click Save to add the Sending Profile to the list.
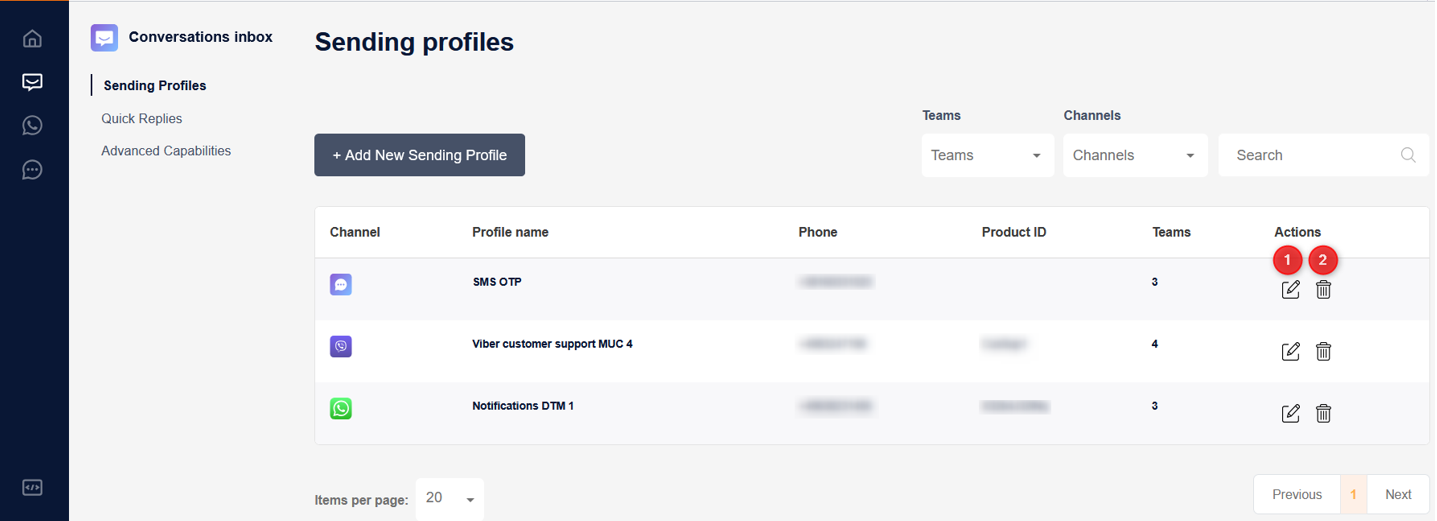
How to edit or delete a Sending Profile
- 1. Go to Conversation Inbox > Sending Profiles to view a table of existing Sending Profiles.
- 2. In the Actions column (far right), you’ll find two icons:
- o Edit ✏️: Opens an edit form to update Sending Profile details.
- o Delete 🗑️: Removes the Sending Profile from the list.
Quick Replies
Quick Replies are pre-saved templates that businesses can use to efficiently handle customer inquiries and proactive outreach. They help streamline communication, reduce response times, and ensure consistency in messaging.
How Quick Replies are used
- ● Pre-Saved Responses: Businesses can create and store frequently used messages such as greetings, FAQs, or troubleshooting steps.
- ● Shortcut Insertion: Agents can insert a Quick Reply by typing a shortcut (e.g., /thanks for “Thank you for reaching out! How can I assist you?”).
- ● Rich Content Support: Quick Replies can include text, images, and links, making them ideal for providing detailed responses.
- ● Improved Efficiency: It reduces repetitive typing, enhances accuracy, and speeds up response time in customer support interactions.
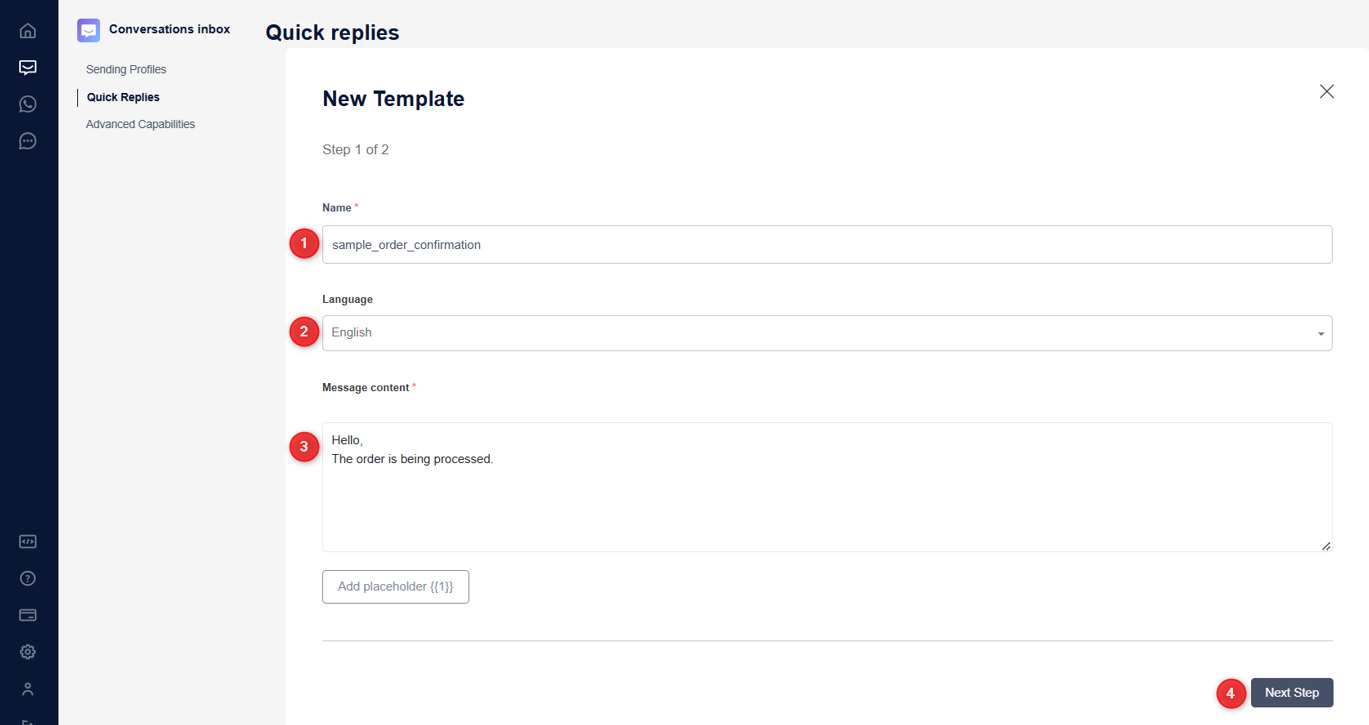
How to create a Quick Reply
- 1. Navigate to Conversation Inbox > Quick Replies.
- 2. Click the + New Template button.
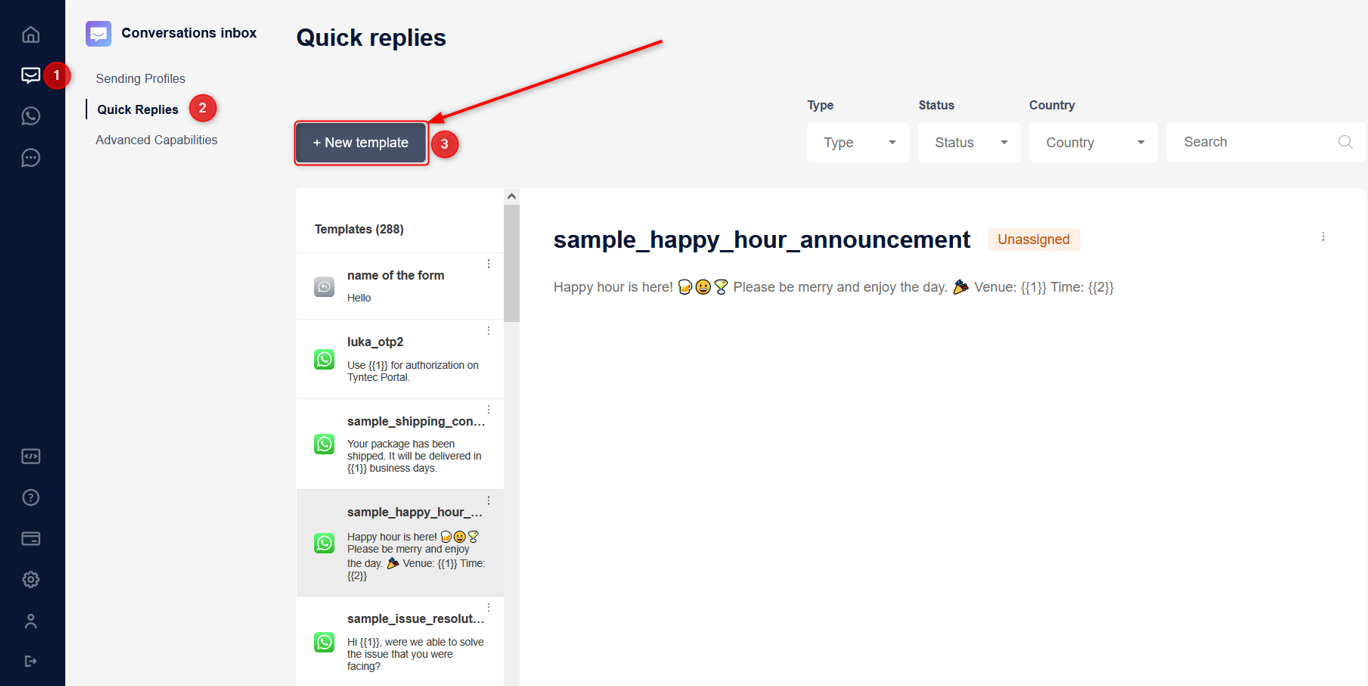
- 3. Complete the form in two steps:
- o Step 1: Enter the Name, Language, and Message content (placeholders can be added).
- o Step 2: Select the Country where this Quick Reply will be available, assign a Sending Profile, and choose one or more Teams. Set the status to Enabled or Disabled.
⚠️ Note: You cannot select both a Country and a Sending Profile since the Sending Profile already contains a predefined Country.
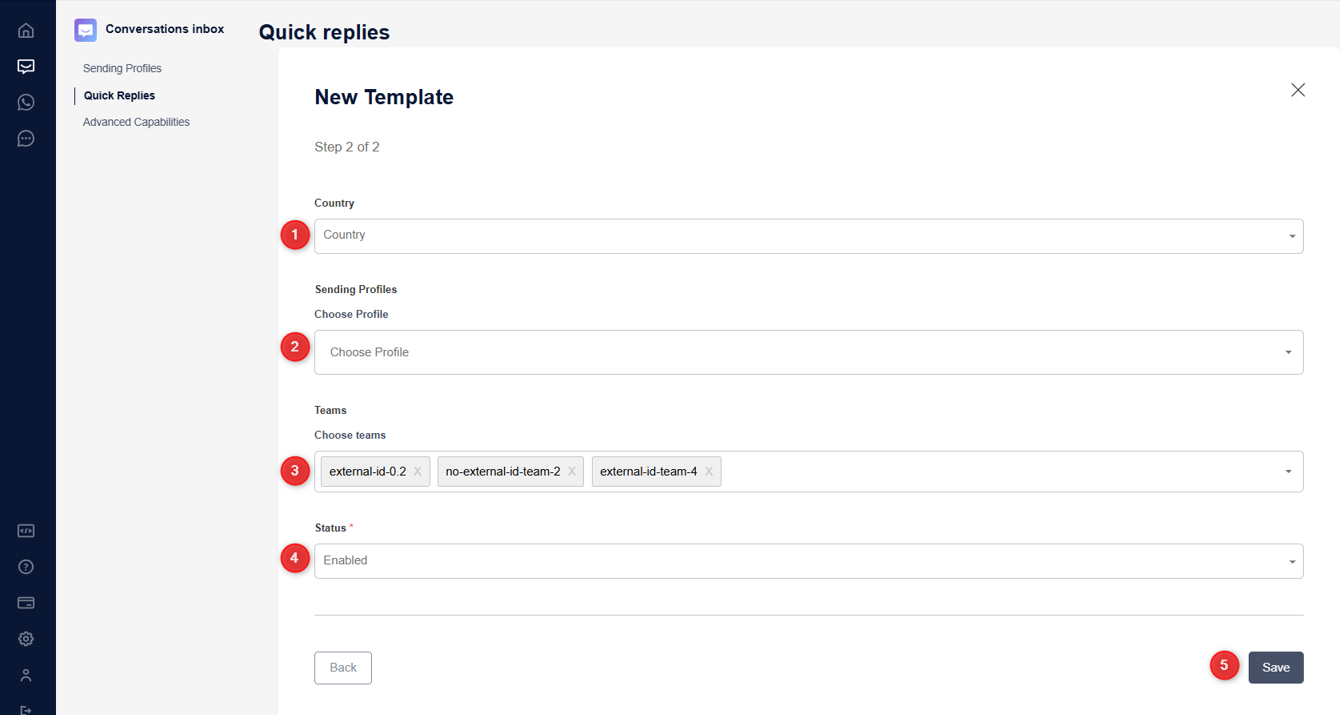
- 4. Click Save to add the Quick Reply to the list.
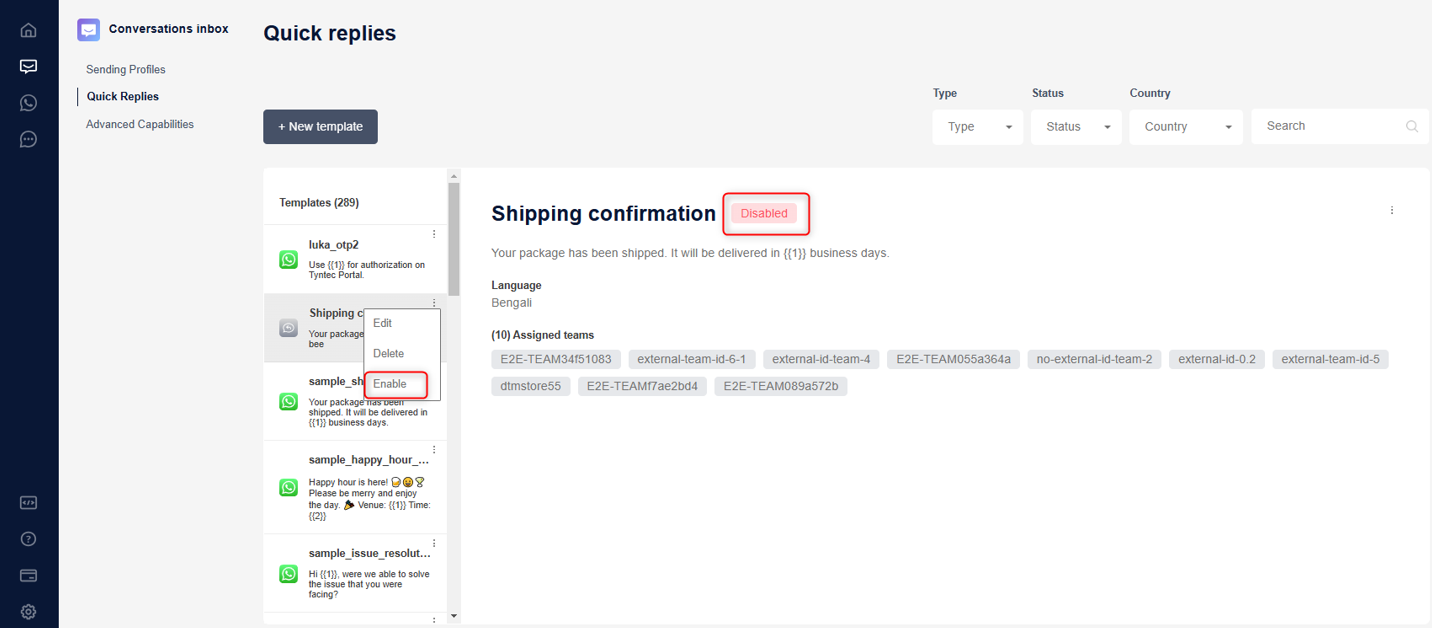
How to edit, delete, or disable a Quick Reply
- 1. Navigate to Conversation Inbox > Quick Replies to view the list of created Quick Replies.
- 2. Next to each template, click the 3-dot icon, which offers the following options:

- o Edit ✏️: Opens an edit form to modify Quick Reply details.
- o Delete 🗑️: Removes the Quick Reply from the list permanently.
- o Disable/Enable 🔄:
- ▪ Disabling adds a Disabled label, preventing it from being used but keeping it in the list.
- ▪ Enabling restores the Quick Reply for use.
Advanced Capabilities
Tags
Tags are labels that businesses can assign to customer conversations to efficiently categorize and organize messages. They help teams track, filter, and manage interactions based on specific topics or statuses.
How Tags are used
- ● Custom Classification: Businesses can create custom tags such as New Lead, Order Inquiry, VIP Customer, or Pending Payment to classify chats.
- ● Improved Search & Filtering: Tags make it easier to search and filter conversations, enhancing workflow management.
- ● Better Response Prioritization: It helps teams prioritize responses and ensure timely follow-ups.
- ● Automation & Segmentation: In some platforms, tags can trigger automated workflows or segment customers for targeted messaging.
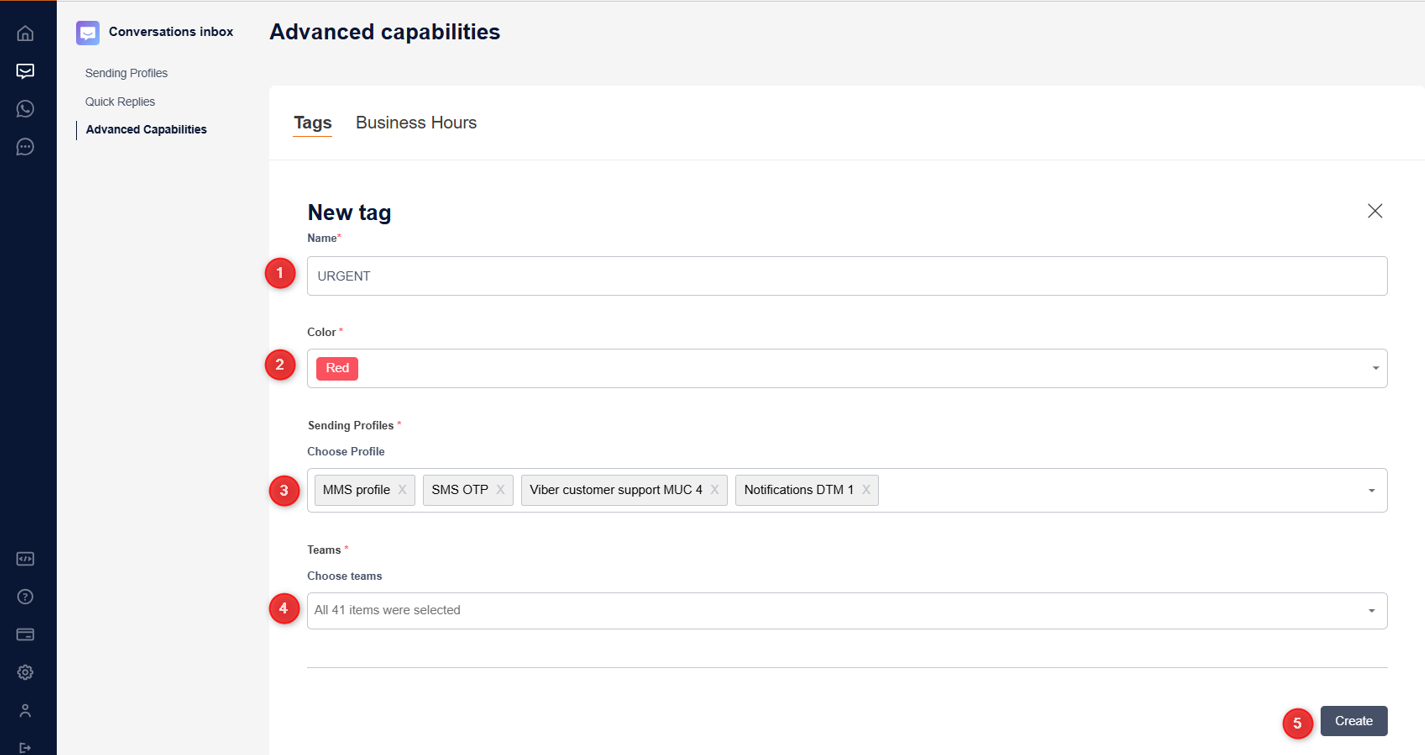
How to create a Tag
- 1. Navigate to Conversation Inbox > Advanced Capabilities > Tags.
- 2. Click the + Make New Tag button.
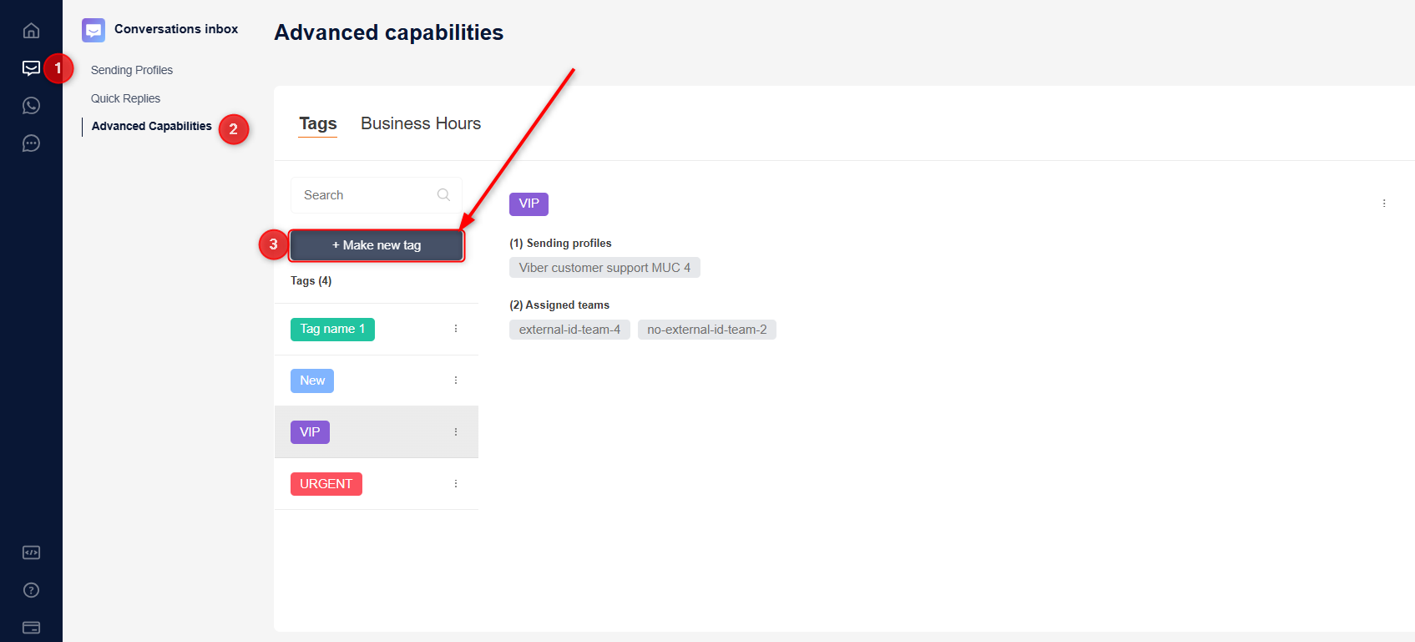
- 3. Fill in the required fields:
- o Name (tag label)
- o Color (for visual distinction)
- o Assign a Sending Profile or Teams (or both).
- 4. Click Create to add the tag to the list.
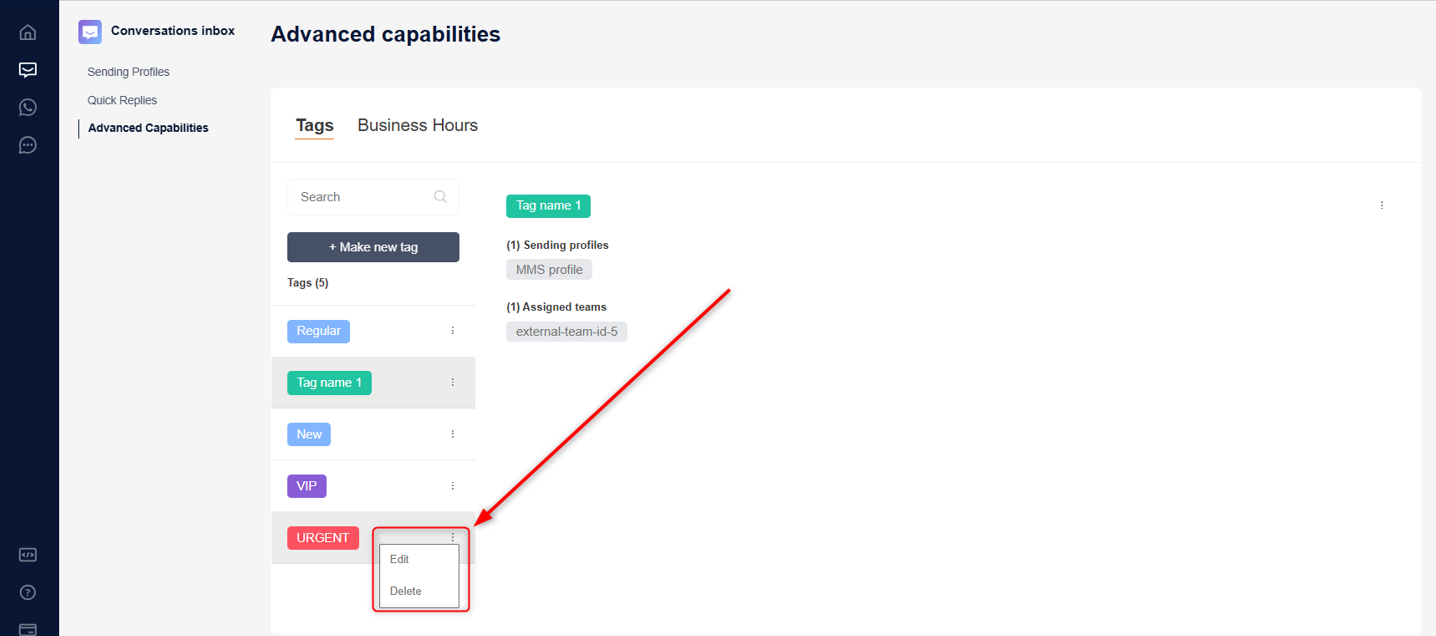
How to edit or delete a Tag
- 1. Go to Conversation Inbox > Advanced Capabilities > Tags to view the list of existing tags.
- 2. Next to each tag, click the 3-dot icon, which provides two options:
- o Edit ✏️: Opens an edit form to modify tag details.
- o Delete 🗑️: Removes the tag from the list permanently.
Business Hours
Business Hours feature allows businesses to set their available working hours for customer communication. It helps manage customer expectations by indicating when support agents are online and when automated responses may be used.
How Business Hours are used
- ● Define Availability: Businesses can set their working days and hours, so customers know when to expect live responses.
- ● Automated Responses: Outside of business hours, automated messages (e.g., Our team is currently unavailable. We will get back to you during business hours.) can be sent.
- ● Message Routing: It ensures that customer inquiries are handled at the right time by the appropriate team.
- ● Flexible Scheduling: Businesses can set different business hours for various departments or locations, providing more customization.
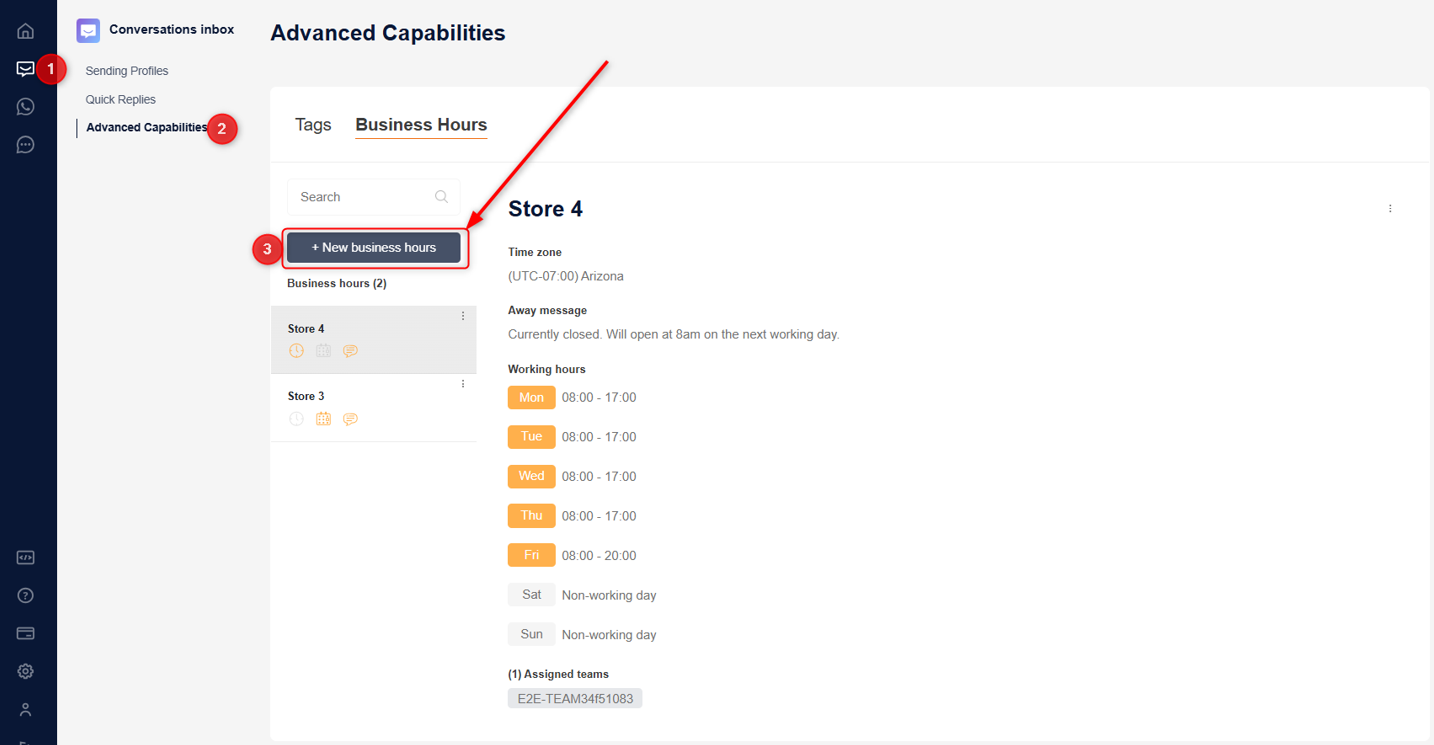
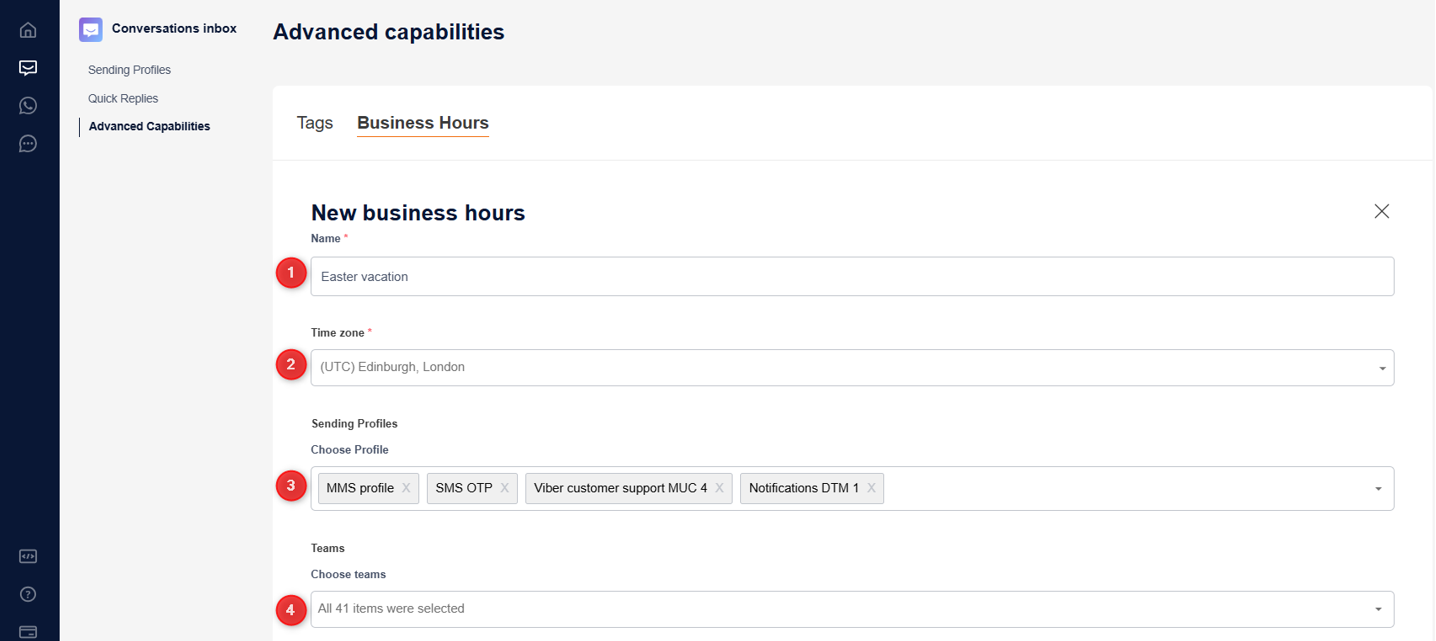
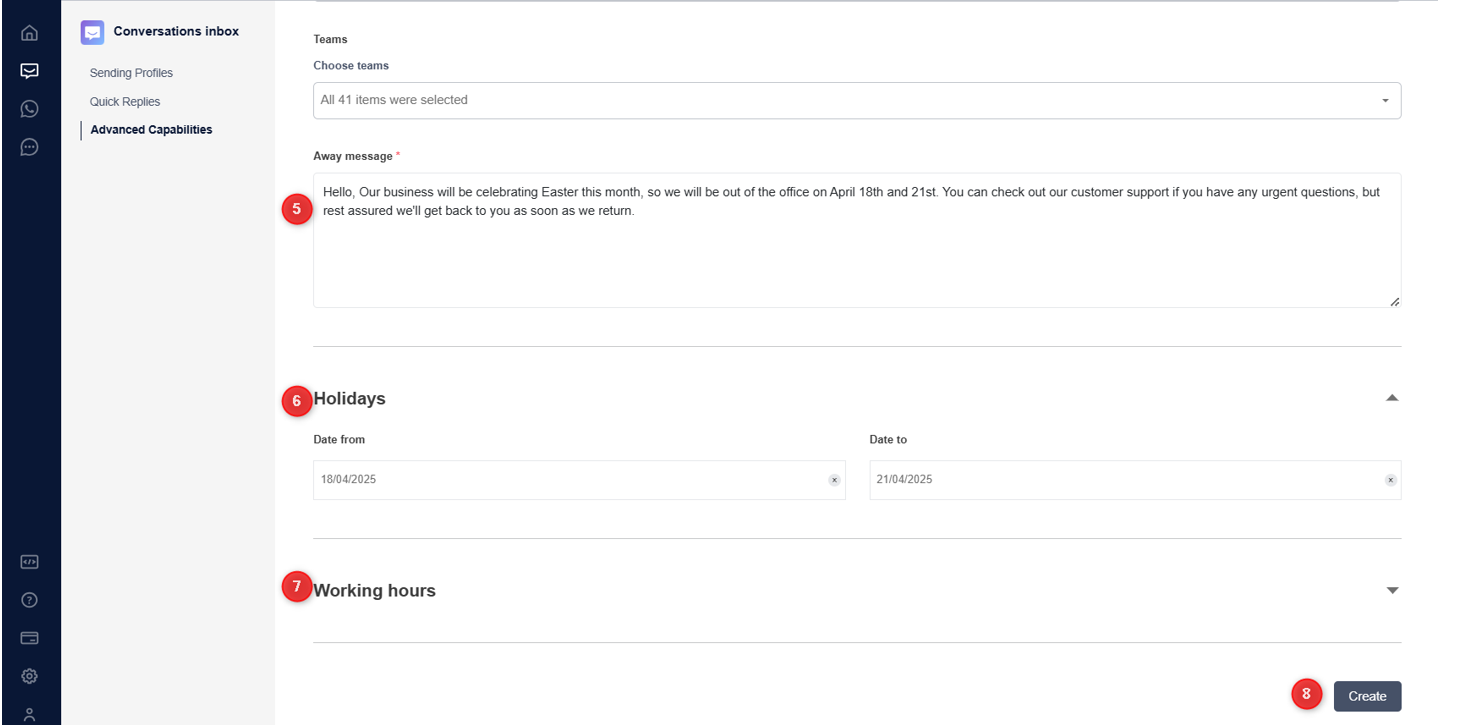
How to create Business Hours
- 1. Navigate to Conversation Inbox > Advanced Capabilities > Business Hours.
- 2. Click the + New Business Hours button.
- 3. Fill in the required fields:
- o Name (for the business hours entry).
- o Time zone (to ensure accuracy across locations).
- o Assign a Sending Profile or Teams (or both).
- 4. Set up the Away Message that will be sent outside of business hours.
- 5. Choose how the Away Message should be applied:
- o Holidays: If referring to vacation periods, set the Date from and Date to fields under the Holidays section.
- o Working Hours: If defining daily availability, set the Time from and Time to fields under the Working hours section.
- 6. Click Create to add the Business Hours entry to the list.
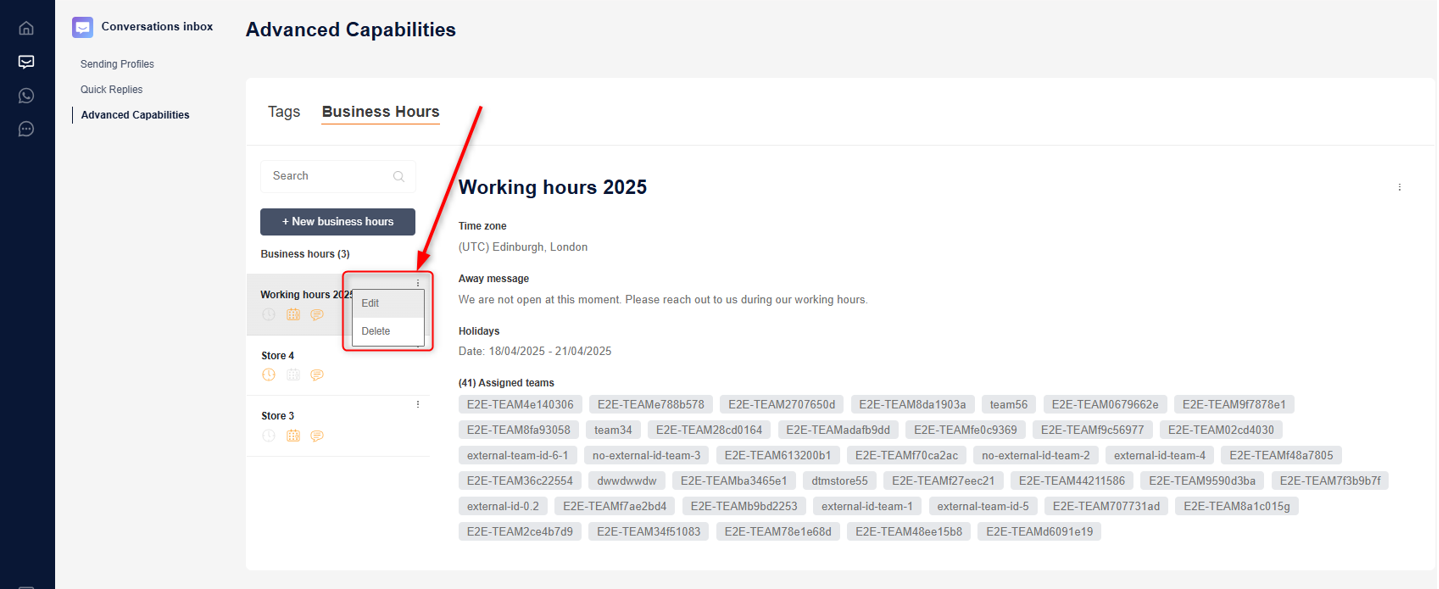
- 1. Navigate to Conversation Inbox > Advanced Capabilities > Business Hours to view a list of previously created entries.
- 2. Next to each Business Hours entry, click the 3-dot icon, which provides two options:
- o Edit ✏️: Opens an edit form to modify Business Hours details.
- o Delete 🗑️: Removes the Business Hours entry from the list permanently.