WhatsApp Business API | Integration for Shopify

Hi there!
In this tutorial, you will learn how to integrate Shopify notifications with the WhatsApp channel in the tyntec Conversations API. This integration allows you to send out time-sensitive messages that need to be looked at right away by your customer. Your notifications can now reach even the ones who are not checking their emails.
You will need
-
- Your tyntec API key from your tyntec account
-
- Your WABA phone number that has been assigned to you by tyntec
-
- WhatsApp template messages created for an order confirmation notification, for a canceled order notification, and for a shipping confirmation notification
-
- A phone with WhatsApp as a testing customer
-
- A Shopify account and a store set up with the manual fulfillment of orders
-
- Ruby on Rails installed
-
- An ngrok account and the binary installed
-
- Your favorite text editor or IDE with Ruby highlighting
Step One: Get your Shopify app ready
We have prepared three Ruby samples that utilize the Shopify App and Conversations API to send notifications on order registrations, order cancellations, and shipping confirmations. Let’s jump right into it.
1. Create a new Shopify app using the following commands:
rails new whatsapp_notifications_app
cd whatsapp_notifications_app
bundle add shopify_app
rails generate shopify_app
2. Create public URL win ngrok using the following command:
path/to/ngrok http 3000
3. Copy the displayed public URL (such as https://d58d59e32a3a.ngrok.io).
Note: This setup is suitable only for development. For production use, you have to deploy your app in production enviroment!
Step Two: Add WhatsApp notifications
To your Shopify app, add endpoints that send WhatsApp notifications and register them as webhooks.
1. Add a TyntecOrdersCreateJob that sends the order confirmation WhatsApp template message. In the app/jobs directory create a file named tyntec_orders_create_job.rb with the following content and replace TEMPLATE with your WhatsApp message template:
require "faraday"

tyntec_endpoint = "https://api.tyntec.com"

CONNECTION = Faraday.new tyntec_endpoint do |connection|
  connection.headers["apikey"] = ENV['TYNTEC_API_KEY']
  connection.headers["Content-Type"] = "application/json"
  connection.headers["Accept"] = "application/json"
end

class TyntecOrdersCreateJob < ActiveJob::Base
  def perform(shop_domain:, webhook:)

    # check if the customer has a phone number
    unless webhook["customer"]["phone"].empty?
      CONNECTION.post("/conversations/v3/messages") do |request|
        request.body = {
          "from": ENV["WHATSAPP_SENDER_PHONE"],
          "to": webhook["customer"]["phone"],
          "channel": "whatsapp",
          "content": {
            "contentType": "template",
            "template": TEMPLATE  # replace TEMPLATE with your WhatsApp message template
          }
        }.to_json
      end
    end
  end
end
2. Add a tyntec_orders_create webhook that starts the TyntecOrdersCreateJob on the order creation. Apply following diff to the config/initializers/shopify_app.rb file and replace ADDRESS with the public URL of the /webhooks/tyntec_orders_create endpoint (e.g. https://d58d59e32a3a.ngrok.io/webhooks/tyntec_orders_create):
diff --git a/config/initializers/shopify_app.rb b/config/initializers/shopify_app.rb
--- a/config/initializers/shopify_app.rb
+++ b/config/initializers/shopify_app.rb
@@ -1,7 +1,7 @@
 ShopifyApp.configure do |config|
   config.application_name = "My Shopify App"
   config.old_secret = ""
-  config.scope = "read_products" # Consult this page for more scope options:
+  config.scope = "read_orders, read_products" # Consult this page for more scope options:
                               	# https://help.shopify.com/en/api/getting-started/authentication/oauth/scopes
   config.embedded_app = true
   config.after_authenticate_job = false
@@ -19,6 +19,15 @@ ShopifyApp.configure do |config|
     raise('Missing SHOPIFY_API_KEY. See https://github.com/Shopify/shopify_app#requirements') unless config.api_key
     raise('Missing SHOPIFY_API_SECRET. See https://github.com/Shopify/shopify_app#requirements') unless config.secret
   end
+
+  config.webhooks = [
+    {
+      topic: "orders/create",
+      address: ADDRESS,  # replace ADDRESS with the public URL of your /webhooks/tyntec_orders_create endpoint
+      format: "json",
+      fields: ["customer", "line_items"]
+    }
+  ]
 end
# ShopifyApp::Utils.fetch_known_api_versions
# Uncomment to fetch known api versions from shopify servers on boot
3. Add a TyntecOrdersCancelledJob that sends the order canceled WhatsApp template message. In the app/jobs directory create a file named tyntec_orders_cancelled_job.rb with the following content and replace TEMPLATE with your message template:
require "faraday"

tyntec_endpoint = "https://api.tyntec.com"

CONNECTION = Faraday.new tyntec_endpoint do |connection|
  connection.headers["apikey"] = ENV['TYNTEC_API_KEY']
  connection.headers["Content-Type"] = "application/json"
  connection.headers["Accept"] = "application/json"
end

class TyntecOrdersCancelledJob < ActiveJob::Base
  def perform(shop_domain:, webhook:)

    # check if the customer has a phone number
    unless webhook["customer"]["phone"].empty?
      CONNECTION.post("/conversations/v3/messages") do |request|
        request.body = {
          "from": ENV["WHATSAPP_SENDER_PHONE"],
          "to": webhook["customer"]["phone"],
          "channel": "whatsapp",
          "content": {
            "contentType": "template",
            "template": TEMPLATE  # replace TEMPLATE with your WhatsApp message template
          }
        }.to_json
  	end
    end
  end
end
4. Add a tyntec_orders_cancelled webhook that starts the TyntecOrdersCancelledJob when an order is canceled. Apply following diff to the config/initializers/shopify_app.rb file and replace ADDRESS with the public URL of the /webhooks/tyntec_orders_cancelled endpoint (e.g. https://d58d59e32a3a.ngrok.io/webhooks/tyntec_orders_cancelled)
diff --git a/config/initializers/shopify_app.rb b/config/initializers/shopify_app.rb
--- a/config/initializers/shopify_app.rb
+++ b/config/initializers/shopify_app.rb
@@ -21,6 +21,12 @@ ShopifyApp.configure do |config|
   end

   config.webhooks = [
+  {
+    topic: "orders/cancelled",
+    address: ADDRESS,  # replace ADDRESS with the public URL of your /webhooks/tyntec_orders_cancelled endpoint
+    format: "json",
+    fields: ["customer", "line_items"]
+  },
   {
     topic: "orders/create",
     address: ADDRESS,  # replace ADDRESS with the public URL of your /webhooks/tyntec_orders_create endpoint
5. Add a TyntecShippingConfirmationJob that sends the shipping confirmation WhatsApp template message. In the app/jobs directory create the tyntec_shipping_confirmation_job.rb file with the following content and replace TEMPLATE with your message template:
require "faraday"

tyntec_endpoint = "https://api.tyntec.com"

CONNECTION = Faraday.new tyntec_endpoint do |connection|
  connection.headers["apikey"] = ENV['TYNTEC_API_KEY']
  connection.headers["Content-Type"] = "application/json"
  connection.headers["Accept"] = "application/json"
end

class TyntecShippingConfirmationJob < ActiveJob::Base
  def perform(shop_domain:, webhook:)
    unless webhook["destination"]["phone"].empty? && webhook["status"] == "pending"
      CONNECTION.post("/conversations/v3/messages") do |request|
        request.body = {
          "from": ENV["WHATSAPP_SENDER_PHONE"],
          "to": webhook["destination"]["phone"],
          "channel": "whatsapp",
          "content": {
            "contentType": "template",
            "template": TEMPLATE  # replace TEMPLATE with your WhatsApp message template
          }
        }.to_json
      end
    end
  end
end
6. Add a tyntec_shipping_confirmation webhook that starts the TyntecShippingConfirmationJob when your fulfillment is created. Apply following diff to the config/initializers/shopify_app.rb file and replace ADDRESS with the public URL of the /webhooks/tyntec_shipping_confirmation endpoint (e.g. https://d58d59e32a3a.ngrok.io/webhooks/tyntec_shipping_confirmation)
diff --git a/config/initializers/shopify_app.rb b/config/initializers/shopify_app.rb
--- a/config/initializers/shopify_app.rb
+++ b/config/initializers/shopify_app.rb
@@ -1,7 +1,7 @@
 ShopifyApp.configure do |config|
   config.application_name = "My Shopify App"
   config.old_secret = ""
-  config.scope = "read_orders, read_products" # Consult this page for more scope options:
+  config.scope = "read_fulfillments, read_orders, read_products" # Consult this page for more scope options:
                               	# https://help.shopify.com/en/api/getting-started/authentication/oauth/scopes
   config.embedded_app = true
   config.after_authenticate_job = false
@@ -21,6 +21,12 @@ ShopifyApp.configure do |config|
   end

   config.webhooks = [
+    {
+      topic: "fulfillments/create",
+      address: ADDRESS,  # replace ADDRESS with the public URL of your /webhooks/tyntec_shipping_confirmation endpoint
+      format: "json",
+      fields: ["status", "destination", "tracking_url"]
+    },
     {
       topic: "orders/cancelled",
       address: ADDRESS,  # replace ADDRESS with the public URL of your /webhooks/tyntec_orders_cancelled endpoint
Now your three notifications are set up!
Step Three: Register the app
Before your application makes any calls using the Shopify API, you need to register your application with Shopify.
1. Log in to the Shopify Partner Dashboard.
2. Click Apps.
3. Click Create app.
4. Choose Custom app. Enter the app name, app URL to the public URL of your application (e.g. https://d58d59e32a3a.ngrok.io), and the allowed redirection URL to the public URL of your application’s callback endpoint (e.g. https://d58d59e32a3a.ngrok.io/auth/shopify/callback).
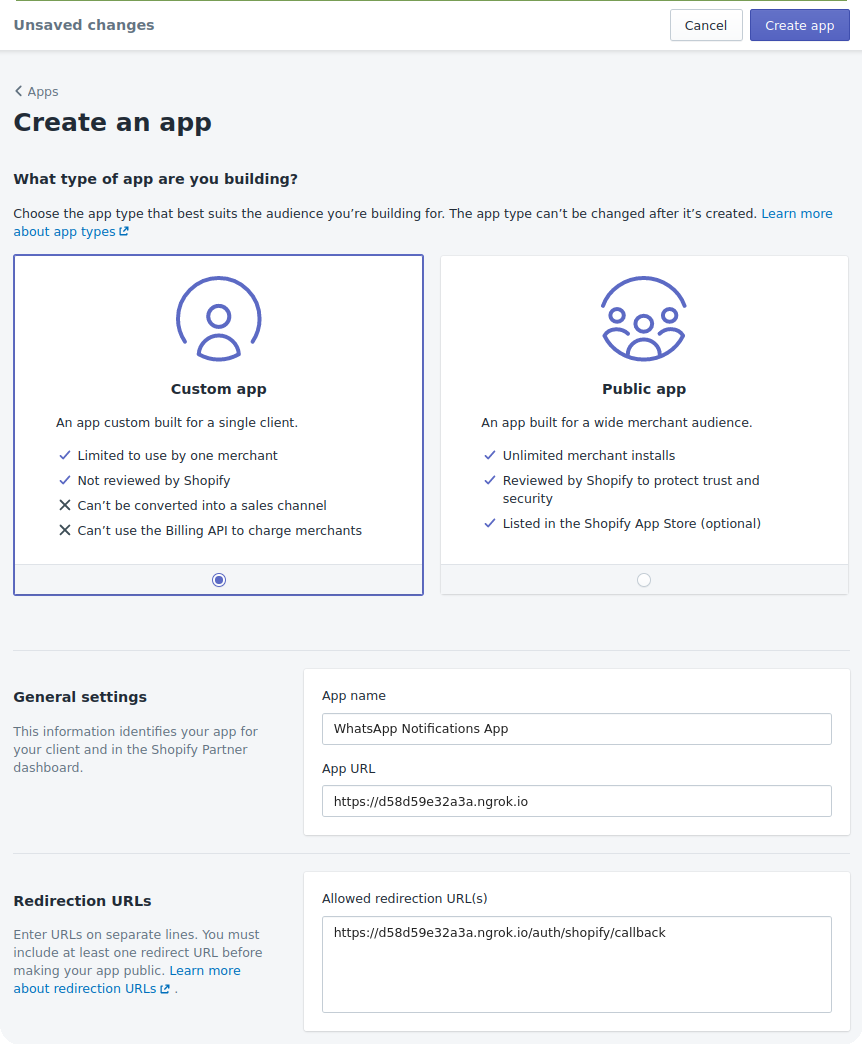
5. Click Create app.
6. Copy the displayed API key and API secret key.
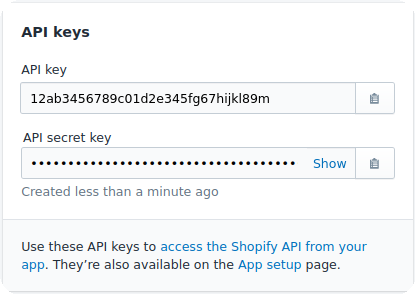
Congratulations, you have successfully registered your application! Using the API key and API secret key, you can now use Shopify API.
Step Four: Configure and run your app
Now, you will configure and run your app.
1. Let’s start with environment variables. Configure them as follows
SHOPIFY_API_KEY – your API key
SHOPIFY_API_SECRET – your API secret key
TYNTEC_API_KEY – yout tyntec API key
WHATSAPP_SENDER_PHONE – your WABA phone number
2. Create the necessary tables in your database using the following command:
rails db:migrate3. Run the app using the following command:
rails server
4. Generate an installation link. Go to the app’s page on the Shopify Partner Dashboard and click the Generate link.
5. Enter your Shopify store domain name. For example, mygreatstore.myshopify.com.
6. Click Generate link and Generate link.
7. Copy the displayed installation link.
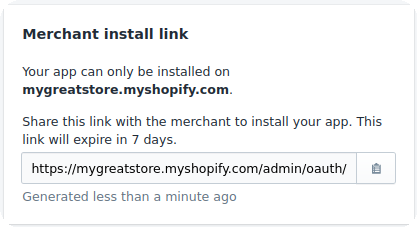
8. Visit the installation link.
9. Click Install app.
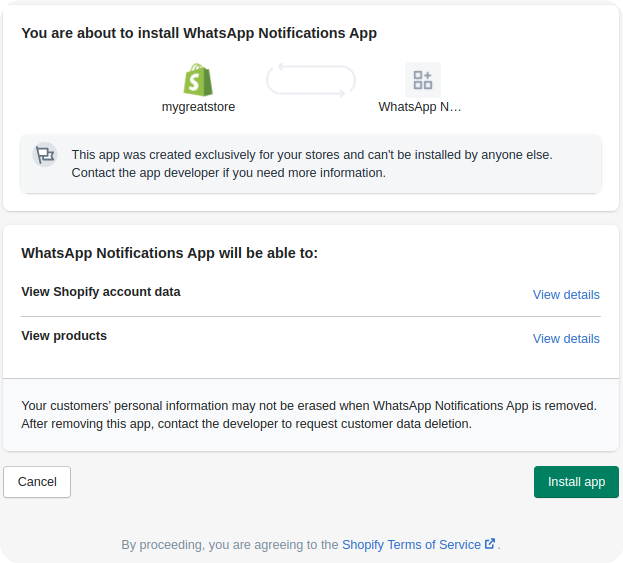
Everything is up and running. Good job!
Step Five: Test your app
Now you can test all the functionalities.
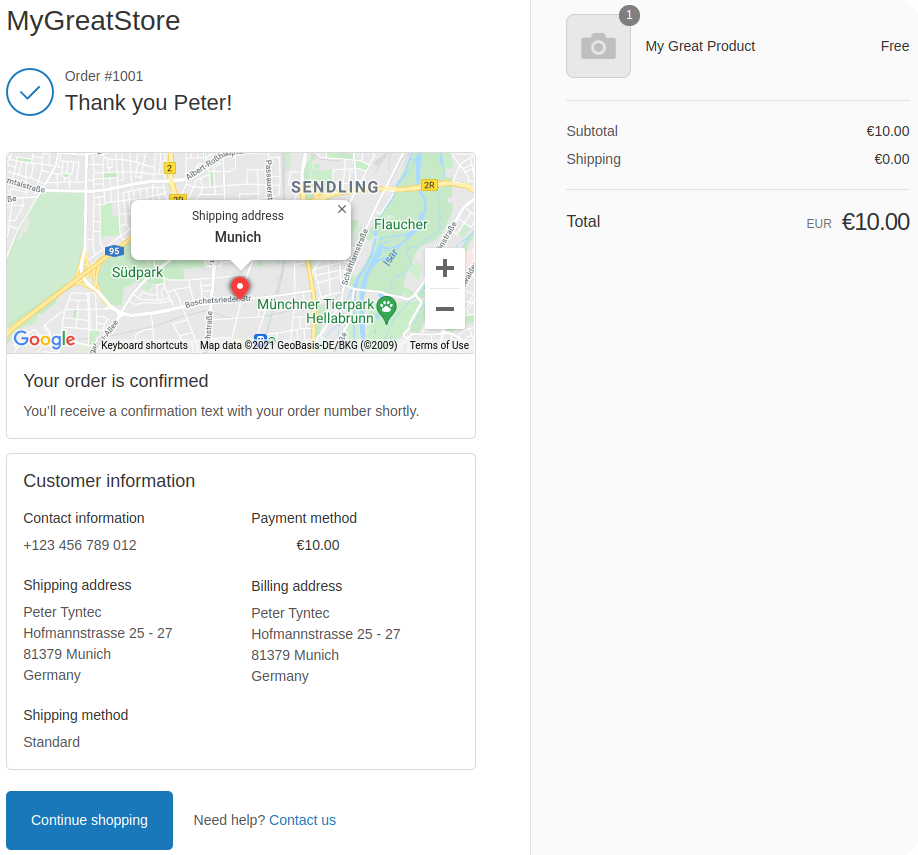
1. Let’s create a new order. Open your online store, add a product to your cart and create an order. Do not forget to fill in your mobile phone number.
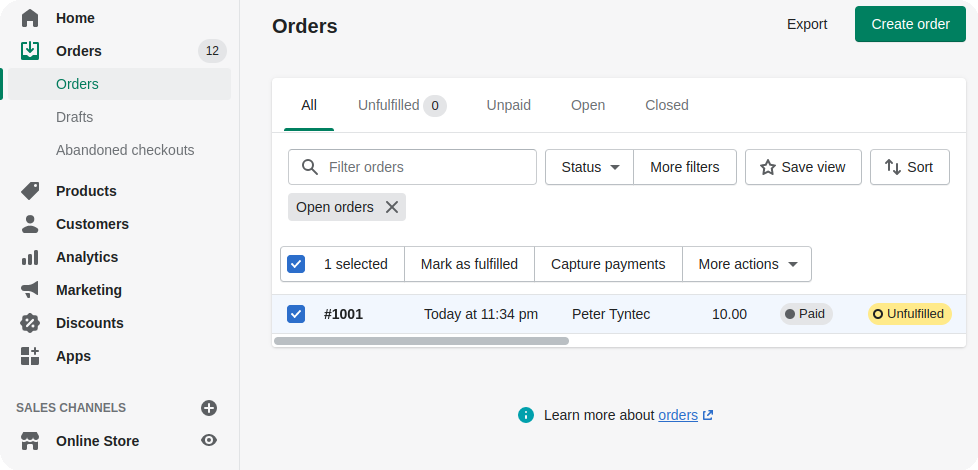
2. Now, create a fulfillment of the order. From your Shopify admin, go to Orders. Make sure that there is your mobile phone number in the shipping address in the order. Select the order and click Mark as fulfilled.
3. Create another order.
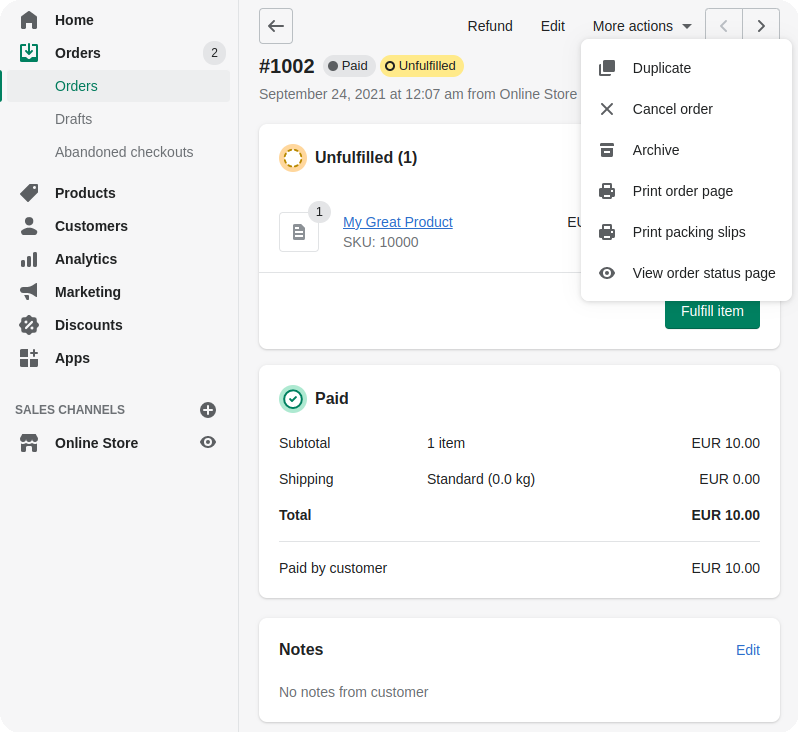
4. And finally, cancel the second order. From your Shopify admin, go to Orders. Click the second order. Click More actions and Cancel order.
5. Grab your phone. In a few moments, you will see four notifications from your online store.
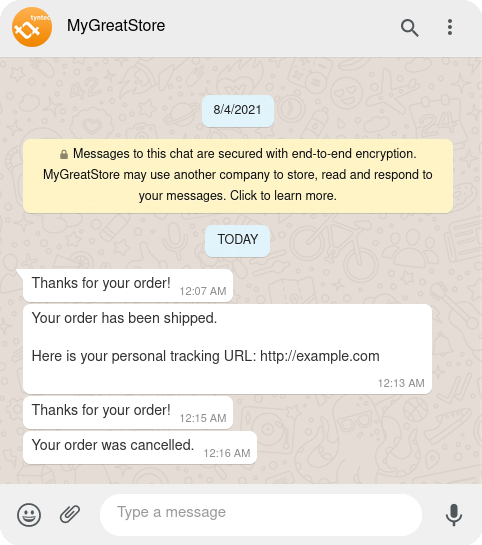
Voila! Your online store now can send WhatsApp notifications!
More?
The Shopify and WhatsApp integration can support much more. For example, you can automatically notify your customers about new products (with images, videos, and documents) using the product create webhook. Take a look at the documentation and get your Shopify shop where people talk.